Any new product or service can be intimidating, and online advertising can be especially scary because of the potential to lose money on ad spend with no leads or sales to show for it. In this post I'll walk you through the step-by-step process that we use in our Hands-On Introduction to Facebook Course and Training so you can get an idea of the workflow that we teach that you can use for your own ad campaigns.
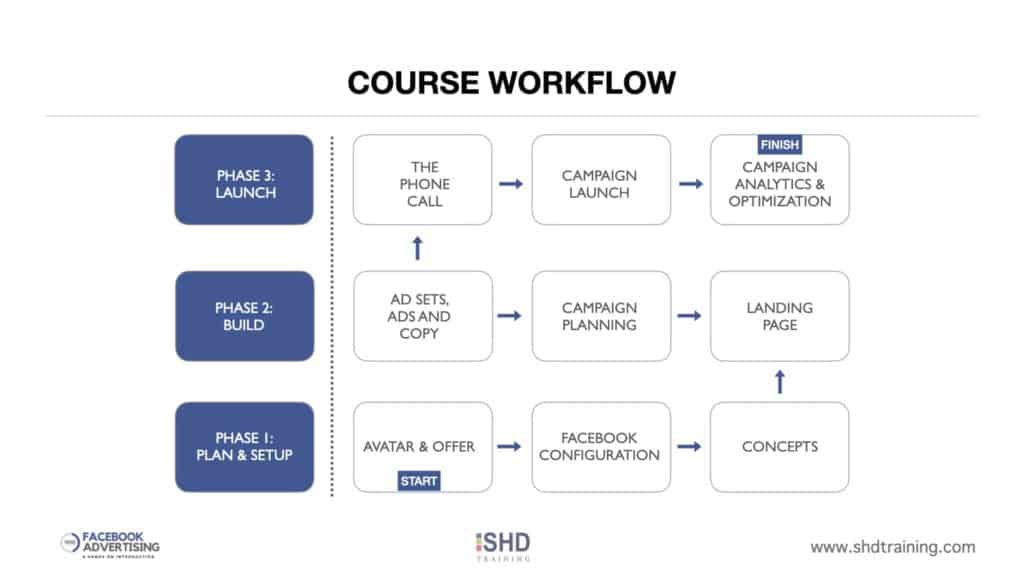
Now that you've seen the overall steps, here's the campaign that we build in the course. Let me preface the diagram below by stating that there are countess methods and strategies you can use to get new leads, clients, patients, likes, and sales with Facebook ads, and the method we teach is just one approach. The reason we like this approach is because it is the simplest campaign to implement, and you can get up and running very quickly.
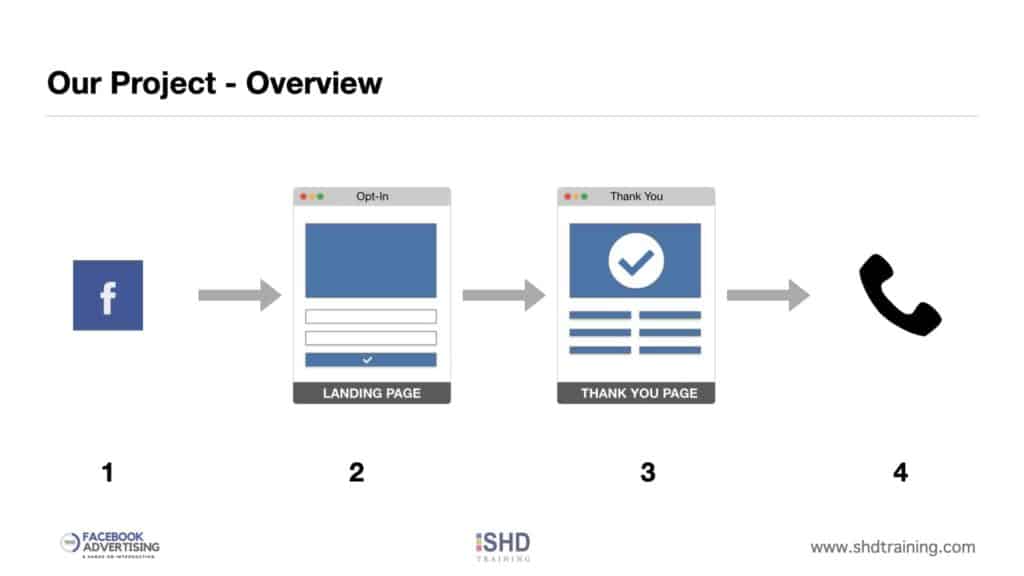
The image above starts with the Facebook logo and that represents our Facebook Ads campaign. Step 2 is the landing page, a non-Facebook web page people will visit when they click on our ads (we call it the opt-in page). This is also the page that has the offer we are presenting to our potential customers and where they submit their contact information or show interest in our offer. Step 3 is the thank you page, where we thank the visitor for submitting their information and encourage them to call our phone number, and/or tell them that we'll be in touch with them soon (the form software you'll use will send you a notification when someone submits their information). Step 4 is the phone call -- the most critical part of the process where you will either win or lose the new customer's business.
Now that we know where we are going to start and where we are going to finish, let's talk about how we get there.
The Planning and Setup Phase consists of three steps: (1) your avatar and your offer, (2) configuring your Facebook account for ads, and (3) understanding some basic concepts about FB Ads.
1. Avatar and Offer
Before you can sell a service or product, you need to define your audience and create an avatar. That is, WHO is it that you are selling your product to, and what do we know about these people? For example, if we are selling a Facebook Advertising course, we might want to target small business owners between the ages of 25-55, who live the US and Canada (for this example), and are interested in online marketing. That's a huge potential audience, but it at least broadly defines who we think might want to buy our course. And are we missing people? Of course -- but we first need to try to sell our course to people who we think are most likely to buy. And once we've had success with this audience, we can expand to other avatars as well. The reason you need to keep a broad audience in the beginning is because your messaging needs to be general enough to apply to many people. In this example, "small business owners" is a large enough group compared to "trading card resellers" or "home renovators" - which are smaller subsets. If we start out with home renovators and tailor all of our messaging to home renovators, if we strike out with this audience then we need to redo all of our marketing collateral (ads, landing pages, etc.) to appeal to our next audience. Thus, by sticking with a broader audience, we might overshoot a bit, but as we get people to opt-in to our offer we can start to see who these people are, and target accordingly. So if we found out that of the 10 people who opted-in to our course, 7 of them are from the online education niche, we might start a sub-campaign or ad set to appeal specifically to this audience, and research that avatar (what is their age range? what websites and brands do they follow?)
You offer is the next critical item you need to create. Your offer needs to be broad enough that it can appeal to a large audience, but not so large that you get lost in the weeds with unqualified leads and wasted traffic. You also want to make sure that your product is priced highly enough that you can make money after spending money on the ads. Our course had an early bird special of $699, a week-before special price of $1049, and a week-of full price of $1249. And after doing some simple math, I came to the conclusion that I'd be willing to spend $100 to get a new participant in my course. Thus, I know that for every $100 I spend on advertising, I want to get one new person in my class. You should now consider how much you'd be willing to pay to acquire a new client or patient or user for your product. And if your product is a subscription service, you might be willing to pay more up-front for that sale. For example, if you sell a $200/mo. subscription, and you know your average subscriber stays for 24 months ($2400 total), it might make sense for you to spend $200-$400 to acquire a new customer.
2. Facebook Configuration
We have this part as a separate lesson because there are some housekeeping things that you need to setup before you can start running ads on Facebook. Here are the critical items:
3. Concepts
Before you start to spend money on advertising, it's important to have an understanding of how Pay-Per-Click Adverting works, and specifically Facebook Ads work. Understand what a campaign is, and how it differs from an Ad Set and an Ad. Read about Facebook Campaign types and the types of people that you can target with each type of campaign.
So you have a head start, recognize that a Campaign is the top-level of a Facebook Advertising endeavor. Campaigns then have a single or multiple ad sets, and ad sets have individual ads. While there is no set rule about how to structure a FB Ads campaign, a common approach is to have a single goal for a single campaign, and use different ad sets to test different audiences with the same ad. In general it's best to use Ad sets when you test audiences, and you almost always want to test audiences right from the start (see our post about split-testing).
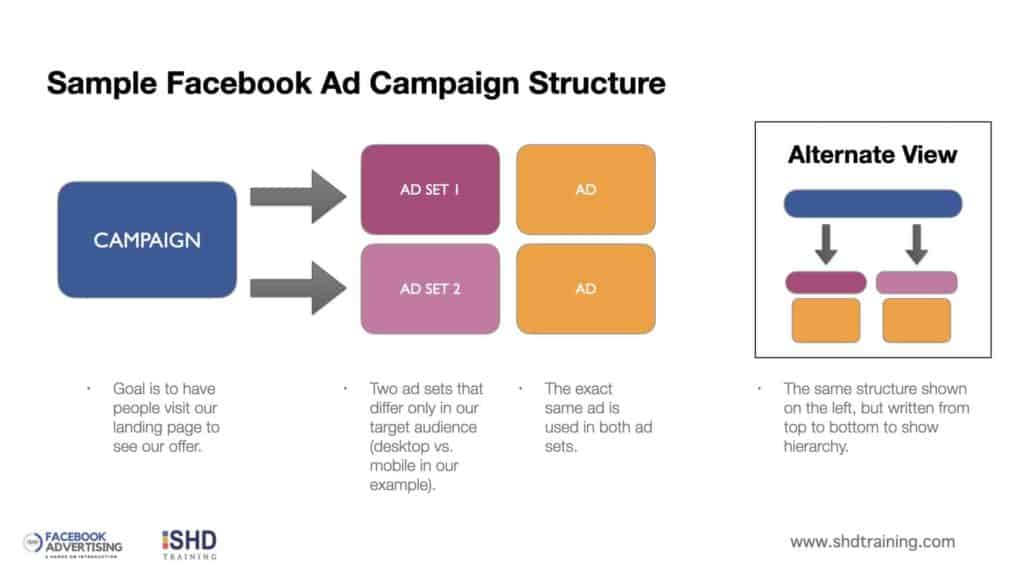
For example, in our case we could create a single campaign where the goal is for people to click the ad and visit our landing page. We'd then setup two ad sets so we can see if we have a better response rate on the desktop or on mobile. So we'd have one ad set that's 25-55 year old men and women in the US using a desktop/laptop, and the second ad set would be exactly the same except we'd switch to mobile devices instead of desktop. In this manner we are doing a controlled test (one variable) to see if our ad performs better with desktop users or mobile users.